
iOS Native SDK Integration Steps
Learn how you can start integrating with Pine Labs Online iOS Native SDK.
The iOS Native SDK integration involves the following steps below:
- Prerequisite
- Installation
- Configure the App Target
- Initialize SDK
- Handle Payments
- Manage Transactions
Note:
- Ensure you store your
client_idandclient_secretin your Backend securely.- Integrate our APIs on your backend system.
- We strictly recommend not to call our APIs from the frontend.
- Failure to adhere to the above guidelines may result in legal implications. In such cases, you will be held responsible for any damage or loss arising from non-compliance.
1. Prerequisite
1.1. Platform & Build Environment
iOS SDK Requirements & Specifications
| Category | Minimum Supported | Description |
|---|---|---|
| iOS Version | iOS 16.0 | Apps must target iOS 16 or higher |
| Deployment Target | iOS 16.0 | Required for SDK integration |
| Swift Version (SDK) | Swift 5.x | SDK is built using Swift 5 |
| Swift Version (App) | Swift 4+ | App source can be Swift 4 or later |
| Xcode Version | Xcode 15.0+ | Required to build iOS 16 apps |
| Framework Type | XCFramework | Device + simulator support |
| Architectures | arm64 | Apple Silicon compatible |
1.2. Enable Apple Pay Capability in Xcode
1. Open Your Project in Xcode
-
Launch Xcode and open your project.
-
In the Project Navigator (left panel), select your project name.
-
Under Targets, select your app target.
2. Configure Signing & Capabilities
-
Click on the Signing & Capabilities tab at the top of the main editor.
-
Ensure that your Team and Bundle Identifier are properly configured.
-
Verify that your project uses a valid Apple Developer account (with Merchant ID access).
3. Add the Apple Pay Capability
- Click the
**+ Capability**button in the top-left corner. - In the popup, search for Apple Pay.
- Double-click Apple Pay (or press Enter) to add it.
- The Apple Pay capability will now appear under your app’s capabilities list.
4. Configure Merchant IDs
- Under the newly added Apple Pay section, locate Merchant IDs.
- Click the “+” button to add one.
- Select an existing Merchant ID if already created in the Apple Developer Portal.
- If not available, choose “Add an Account → Manage Certificates, Identifiers & Profiles” to create a new Merchant ID.
- Use a naming convention such as:
bussiness_name.com.yourcompany.app
5. Verify Entitlements
Xcode automatically adds the required entitlements file (if not already present) and enables the following key:
<key>com.apple.developer.in-app-payments</key>
<array>
  <string>merchant.com.yourcompany.app</string>
</array>
This ensures your app is authorized to process Apple Pay transactions using the registered Merchant ID(s).
1.3. Integrate APIs in Your Backend
Start a payment by triggering the payment flow. To start a payment, follow the below steps:
1.3.1. Generate Token
Integrate our Generate Token API in your backend servers to generate the auth token. Use the token generated to authenticate Pine Labs Online APIs.
Below are the sample requests and response for the Generate Token API.
curl --location 'https://pluraluat.v2.pinepg.in/api/auth/v1/token' \
--header 'accept: application/json' \
--header 'content-type: application/json' \
--header 'Request-Timestamp: 2024-07-09T07:57:08.022Z' \
--header 'Request-ID: c17ce30f-f88e-4f81-ada1-c3b4909ed235' \
--data '
{
  "client_id": "a17ce30e-f88e-4f81-ada1-c3b4909ed232",
  "client_secret": "fgwei7egyhuggwp39w8rh",
  "grant_type": "client_credentials"
}
'
curl --location 'https://api.pluralpay.in/api/auth/v1/token' \
--header 'accept: application/json' \
--header 'content-type: application/json' \
--header 'Request-Timestamp: 2024-07-09T07:57:08.022Z' \
--header 'Request-ID: c17ce30f-f88e-4f81-ada1-c3b4909ed235' \
--data '
{
  "client_id": "a17ce30e-f88e-4f81-ada1-c3b4909ed232",
  "client_secret": "fgwei7egyhuggwp39w8rh",
  "grant_type": "client_credentials"
}
'
{
  "access_token": "eyJhbGciOiJIUzI1NiIsInR5cCI6IkpXVCJ9.eyJzdWIiOiIxMjM0NTY3ODkwIiwibmFtZSI6IkpvaG4gRG9lIiwiaWF0IjoxNTE2MjM5MDIyfQ.SflKxwRJSMeKKF2QT4fwpMeJf36POk6yJV_adQssw5c",
  "expires_in": 3600
}
Click here for request and response parameter information.
The table below lists the request parameters of our Generate Token API.
| Parameter | Type | Description |
|---|---|---|
| client_id required | string |
Unique client identifier in the Pine Labs Online database. Example: a17ce30e-f88e-4f81-ada1-c3b4909ed232Note: The Onboarding team has provided you with this information as part of the onboarding process. |
| client_secret required | string |
Unique client secret key provided while onboarding. Example: fgwei7egyhuggwp39w8rhNote: The Onboarding team has provided you with this information as part of the onboarding process. |
| grant_type required | string |
The grant type to generate an access token. Accepted value: client_credentials
|
The table below lists the response parameters of our Generate Token API.
| Parameter | Type | Description |
|---|---|---|
| access_token | string |
The access token generated by the system. • Minimum length: 1 character. • Maximum length: 8192 characters. Example: eyJhbGciOiJIUzI1NiIsInNote: Use this token in the authorization headers to authenticate Pine Labs Online APIs. |
| expires_at | string |
Access duration timestamp. Example: 2024-06-28T13:26:06.909140Z
|
Refer to our Generate Token API documentation to learn more.
1.3.2. Generate Checkout Link
Use this API to create a infinity checkout link, for authentication use the generated access token in the headers of the API request.
Below are the sample requests and response for a Generate Checkout Link API.
curl --location 'https://pluraluat.v2.pinepg.in/api/checkout/v1/orders' \
--header 'Authorization: Bearer eyJhbGciOiJIUzI1NiIsInR5cCI6IkpXVCJ9.eyJzdWIiOiIxMjM0NTY3ODkwIiwibmFtZSI6IkpvaG4gRG9lIiwiaWF0IjoxNTE2MjM5MDIyfQ.SflKxwRJSMeKKF2QT4fwpMeJf36POk6yJV_adQssw5c' \
--header 'Content-Type: application/json' \
--header 'Request-ID: c17ce30f-f88e-4f81-ada1-c3b4909ed235' \
--header 'Request-Timestamp: 2024-07-09T07:57:08.022Z' \
--header 'accept: application/json' \
--data '
{
  "merchant_order_reference": "112345",
  "order_amount": {
    "value": 1100,
    "currency": "INR"
  },
  "integration_mode": "SDK",
  "pre_auth": false,
  "allowed_payment_methods": [
    "CARD",
    "UPI",
    "NETBANKING",
    "POINTS",
    "WALLET"
  ],
  "notes": "order1",
  "callback_url": "https://sample-callback-url",
  "failure_callback_url": "https://sample-failure-callback-url",
  "purchase_details": {
    "customer": {
      "email_id": "[email protected]",
      "first_name": "Kevin",
      "last_name": "Bob",
      "customer_id": "123456",
      "mobile_number": "9876543210",
      "country_code": "91",
      "billing_address": {
        "address1": "10 Downing Street Westminster London",
        "address2": "Oxford Street Westminster London",
        "address3": "Baker Street Westminster London",
        "pincode": "51524036",
        "city": "Westminster",
        "state": "Westminster",
        "country": "London",
        "full_name": "harsh kumar",
        "address_type": "HOME/WORK/OTHER",
        "address_category": "BILLING"
      },
      "shipping_address": {
        "address1": "10 Downing Street Westminster London",
        "address2": "Oxford Street Westminster London",
        "address3": "Baker Street Westminster London",
        "pincode": "51524036",
        "city": "Westminster",
        "state": "Westminster",
        "country": "London",
        "full_name": "harsh kumar",
        "address_type": "HOME/WORK/OTHER",
        "address_category": "BILLING"
      }
    },
    "merchant_metadata": {
      "express_checkout_enabled": "TRUE",
      "express_checkout_allowed_action": "checkoutCollectAddress",
      "key1": "DD",
      "key2": "XOF"
    }
  },
  "cart_details": {
    "cart_items": [
      {
        "item_id": "cart_id_1",
        "item_name": "T Shirt",
        "item_description": "Test Description",
        "item_details_url": "https://chriscross.in/cdn/shop/files/95_800x.jpg",
        "item_image_url": "https://chriscross.in/cdn/shop/files/95_800x.jpg",
        "item_original_unit_price": 1,
        "item_discounted_unit_price": 1,
        "item_quantity": 1,
        "item_currency": "INR"
      }
    ]
  }
}
'
curl --location 'https://api.pluralpay.in/api/checkout/v1/orders' \
--header 'Authorization: Bearer eyJhbGciOiJIUzI1NiIsInR5cCI6IkpXVCJ9.eyJzdWIiOiIxMjM0NTY3ODkwIiwibmFtZSI6IkpvaG4gRG9lIiwiaWF0IjoxNTE2MjM5MDIyfQ.SflKxwRJSMeKKF2QT4fwpMeJf36POk6yJV_adQssw5c' \
--header 'Content-Type: application/json' \
--header 'Request-ID: c17ce30f-f88e-4f81-ada1-c3b4909ed235' \
--header 'Request-Timestamp: 2024-07-09T07:57:08.022Z' \
--header 'accept: application/json' \
--data '
{
  "merchant_order_reference": "112345",
  "order_amount": {
    "value": 1100,
    "currency": "INR"
  },
  "integration_mode": "SDK",
  "pre_auth": false,
  "allowed_payment_methods": [
    "CARD",
    "UPI",
    "NETBANKING",
    "POINTS",
    "WALLET"
  ],
  "notes": "order1",
  "callback_url": "https://sample-callback-url",
  "failure_callback_url": "https://sample-failure-callback-url",
  "purchase_details": {
    "customer": {
      "email_id": "[email protected]",
      "first_name": "Kevin",
      "last_name": "Bob",
      "customer_id": "123456",
      "mobile_number": "9876543210",
      "country_code": "91",
      "billing_address": {
        "address1": "10 Downing Street Westminster London",
        "address2": "Oxford Street Westminster London",
        "address3": "Baker Street Westminster London",
        "pincode": "51524036",
        "city": "Westminster",
        "state": "Westminster",
        "country": "London",
        "full_name": "harsh kumar",
        "address_type": "HOME/WORK/OTHER",
        "address_category": "BILLING"
      },
      "shipping_address": {
        "address1": "10 Downing Street Westminster London",
        "address2": "Oxford Street Westminster London",
        "address3": "Baker Street Westminster London",
        "pincode": "51524036",
        "city": "Westminster",
        "state": "Westminster",
        "country": "London",
        "full_name": "harsh kumar",
        "address_type": "HOME/WORK/OTHER",
        "address_category": "BILLING"
      }
    },
    "merchant_metadata": {
      "express_checkout_enabled": "TRUE",
      "express_checkout_allowed_action": "checkoutCollectAddress",
      "key1": "DD",
      "key2": "XOF"
    }
  },
  "cart_details": {
    "cart_items": [
      {
        "item_id": "cart_id_1",
        "item_name": "T Shirt",
        "item_description": "Test Description",
        "item_details_url": "https://chriscross.in/cdn/shop/files/95_800x.jpg",
        "item_image_url": "https://chriscross.in/cdn/shop/files/95_800x.jpg",
        "item_original_unit_price": 1,
        "item_discounted_unit_price": 1,
        "item_quantity": 1,
        "item_currency": "INR"
      }
    ]
  }
}
'
{
  "token": "REDIRECT TOKEN",
  "order_id": "ORDER ID",
  "redirect_url": "https://api.pluralonline.com/api/v3/checkout-bff/redirect/checkout?token=REDIRECT TOKEN",
  "response_code": 200,
  "response_message": "Order Creation Successful."
}
Click here for request and response parameter information.
The table below lists the request parameters of our Create Checkout Link API.
| Parameter | Type | Description |
|---|---|---|
| merchant_order_reference required | string |
Enter a unique identifier for the order request.
1234567890Supported characters:
|
| order_amount required | object |
An object that contains the transaction amount details. Learn more about the order_amount child object.
|
pre_auth | boolean |
The pre-authorization type. Possible values:
|
| allowed_payment_methods | array of strings |
The type of payment methods you want to offer customers. Accepted values:
Note: Ensure it is configured for you. |
| notes | string |
Note to show against an order. Example: Order1
|
| callback_url | string |
Use this URL to redirect your customers to specific success or failure pages based on the order or product details. Example: https://sample-callback-url |
| failure_callback_url | string |
Use this URL to redirect your customers to specific failure pages based on the order or product details. Example: https://sample-failure-callback-url |
| purchase_details | object |
An object that contains purchase details. Learn more about the purchase_details child object.
|
| cart_details | object |
An object that contains cart details. Learn more about the cart_details child object.
|
Order Amount [Child Object]
The table below lists the various parameters in the order_amount child object. This object is part of the Create Checkout Link request object.
| Parameter | Type | Description |
|---|---|---|
| value required | integer |
Transaction amount in Paisa.
1000
|
| currency required | string |
Type of currency. Example: INR
|
Purchase Details [Child Object]
The table below lists the various parameters in the purchase_details child object. This object is part of the Create Checkout Link request object.
| Parameter | Type | Description |
|---|---|---|
| customer | object |
An object that contains the customer details. Learn more about the customer child object. |
| merchant_metadata | object |
An object of key-value pair that can be used to store additional information. Learn more about the merchant_metadata child object. |
Customer [Child Object]
The table below lists the various parameters in the customer child object. This is part of the purchase_details object.
| Parameter | Type | Description |
|---|---|---|
| email_id | string |
Customer's email address.
[email protected] |
| first_name | string |
Customer's first name.
Kevin |
| last_name | string |
Customer's last name.
Bob |
| customer_id | string |
Unique identifier of the customer in the Pine Labs Online database.
123456 |
| mobile_number | string |
Customer's mobile number.
9876543210 |
| country_code | string |
Country code of the registered mobile number.
91Note: If the country code is not provided, it defaults to 91. |
| billing_address | object |
An object that contains the details of the billing address. Learn more about our billing_address child object. |
| shipping_address | object |
An object that contains the shipping address details. Learn more about our shipping_address child object. |
Billing Address [Child Object]
The table below lists the various parameters in the billing_address child object. This is part of the customer object.
| Parameter | Type | Description |
|---|---|---|
| address1 | string | Customer's billing address1.
10 Downing Street Westminster London |
| address2 | string | Customer's billing address2.
Oxford Street Westminster London |
| address3 | string | Customer's billing address3.
Baker Street Westminster London |
| pincode | string | Pincode of the billing address.
51524036 |
| city | string | City of the billing address.
Westminster |
| state | string | State of the billing address.
Westminster |
| country | string | Country of the billing address.
London |
| full_name | string | Full name of the customer.
Doctor Strange |
| address_type | string | Type of the billing address. Example: HomeAccepted values:
|
| address_category | string | Address category. Example: Billing |
Shipping Address [Child Object]
The table below lists the various parameters in the shipping_address child object. This is part of the customer object.
| Parameter | Type | Description |
|---|---|---|
| address1 | string | Customer's shipping address1.
10 Downing Street Westminster London |
| address2 | string | Customer's shipping address2.
Oxford Street Westminster London |
| address3 | string | Customer's shipping address3.
Baker Street Westminster London |
| pincode | string | Pincode of the shipping address.
51524036 |
| city | string | City of the shipping address.
Westminster |
| state | string | State of the shipping address.
Westminster |
| country | string | Country of the shipping address.
London |
| full_name | string | Full name of the customer.
Doctor Strange |
| address_type | string | Type of the shipping address. Example: HomeAccepted values:
|
| address_category | string | Address category. Example: Shipping |
Merchant Metadata [Child Object]
The table below lists the various parameters in the merchant_metadata child object. This object is part of the purchase_details child object.
| Parameter | Type | Description |
|---|---|---|
| express_checkout_allowed_action | string |
Access allowed during the express checkout. Accepted values:
|
Cart Details [Child Object]
The table below lists the various parameters in the cart_details child object. This object is part of the Create Checkout Link request object.
| Parameter | Type | Description |
|---|---|---|
| cart_items | array of objects |
An object that contains the cart item details. Learn more about the cart_itmes child object. |
Cart Items [Child Object]
The table below lists the various parameters in the cart_items child object. This object is part of the cart_details child object.
| Parameter | Type | Description |
|---|---|---|
| item_id | string |
Unique identifier of the item. Example: cart_id_1
|
| item_name | string |
Name of the item. Example: T Shirt
|
| item_description | string |
Description corresponding to the item. Example: Shopping on Diwali Sale
|
| item_image_url | string |
Image URL of the item. Example: https://chriscross.in/cdn/shop/files/95_800x.jpgNote: To ensure better resolution and optimal display on the checkout, please provide the image in 24x24 dimensions.
|
| item_original_unit_price | string |
Original price of the item. Example: 199
|
| item_discounted_unit_price | string |
Discount price of the item. Example: 49
|
| item_quantity | string |
Number of items purchased. Example: 2
|
| item_currency | string |
Indicates the currency type for the purchase of the item. Example: INR
|
The table below lists the various parameters returned in the Generate Checkout Link response objects.
| Parameter | Type | Description | token | string |
Token generated by our system for Pine Labs Online Hosted Checkout. Example: eyJhbGciOiJIUzI1NiIsInR5cCI6IkpXVCJ9.eyJzdWIiOiIxMjM0NTY3ODkwIiwibmFtZSI6IkpvaG4gRG9lIiwiaWF0IjoxNTE2MjM5MDIyfQ.SflKxwRJSMeKKF2QT4fwpMeJf36POk6yJV_adQssw5c
|
|---|---|---|
| order_id | string |
Unique identifier of the order in the Pine Labs Online database. Example: v1-5757575757-aa-hU1rUd |
| redirect_url | string |
The checkout link generated on our system. Example: https://api.pluralonline.com/api/v3/checkout-bff/redirect/checkout?token=< |
| response_code | integer |
Response code of the request. Example: 200 |
| response_message | string |
Corresponding message to the response code. Example: Order Creation Successful
|
Refer to our Generate Checkout Link API documentation to learn more.
2. Installation
Follow the below steps to install Pine Labs Online iOS Native SDK using Xcode. We provide two methods to integrate our SDK into your project.
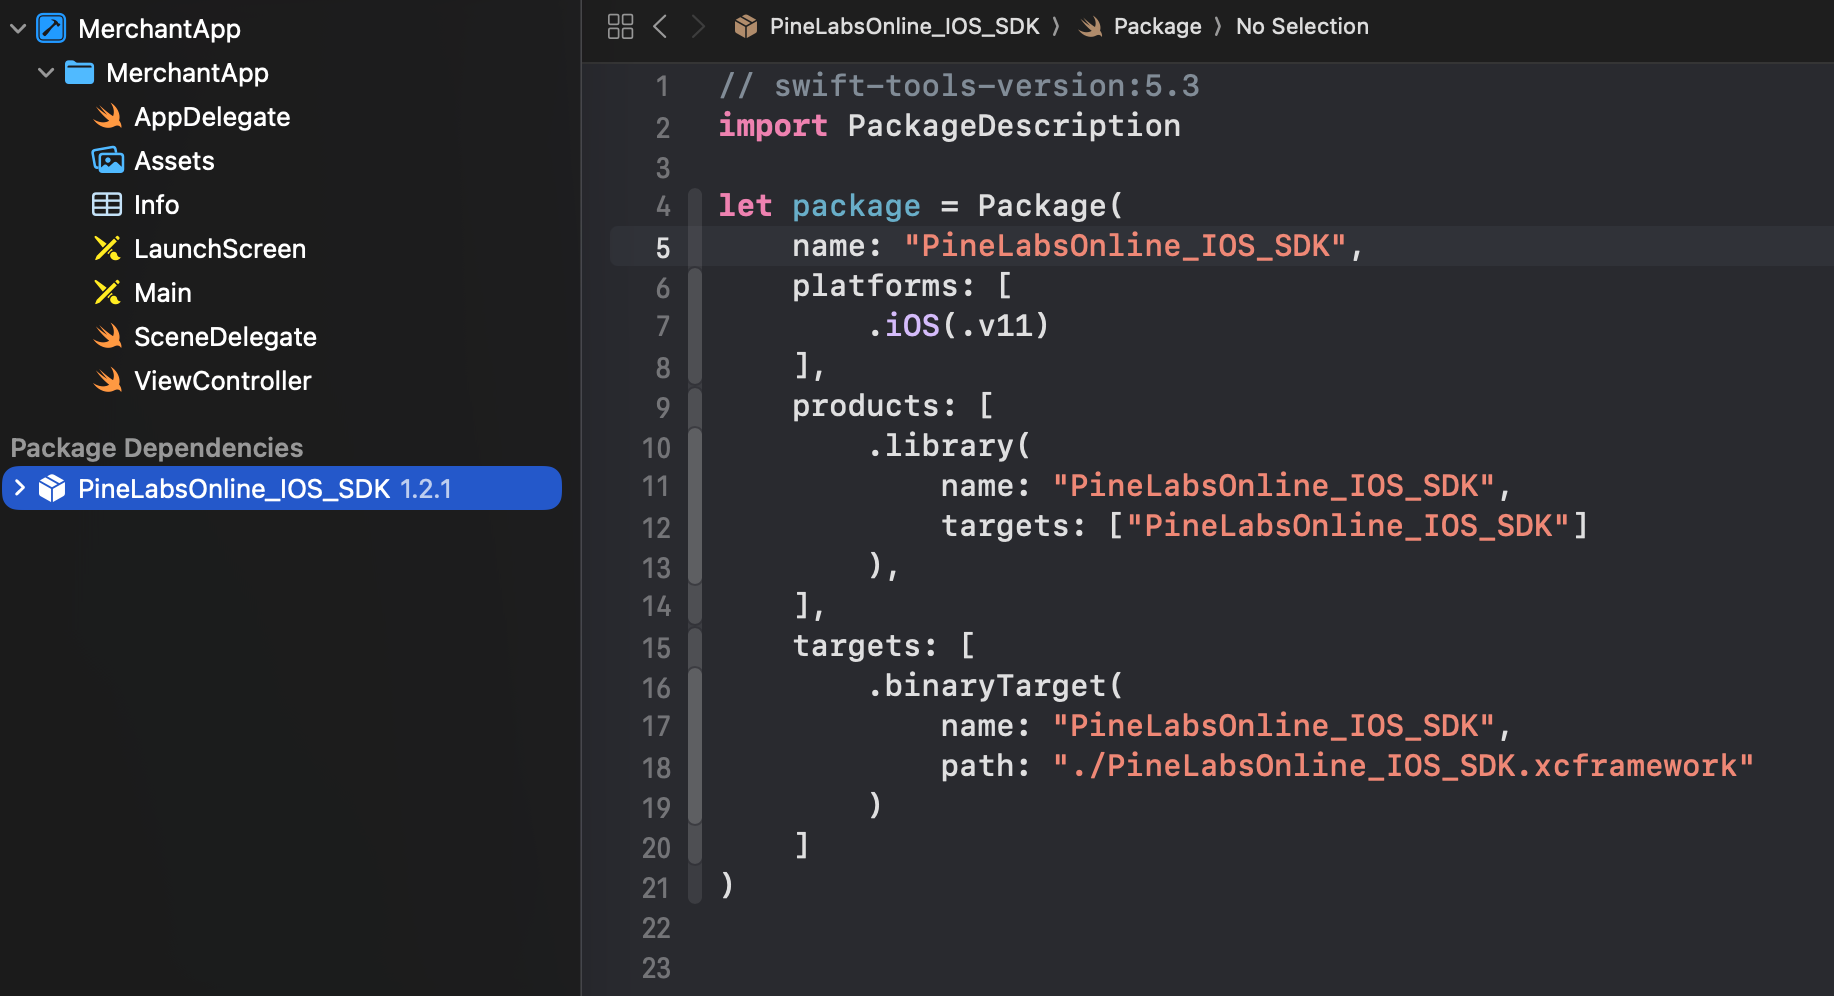
2.1 Add the SDK via Swift Package Manager
Recommended method for easy updates and dependency management
Requirements
Installation Steps
Open your project in Xcode
Launch Xcode and open your iOS project.
Navigate to Add Packages
Go to the menu:
File → Add Packages…
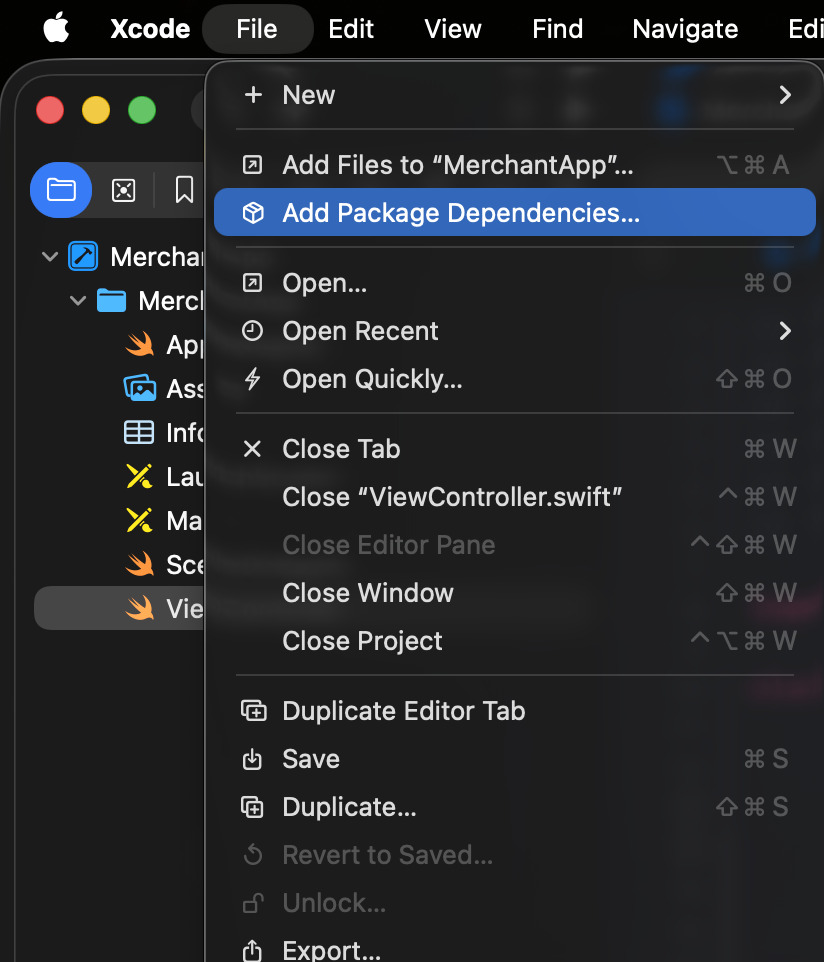
Enter SDK GitHub URL
In the search bar, paste the SDK GitHub URL https://github.com/plural-pinelabs/Infinity_Checkout_iOS_SDK.
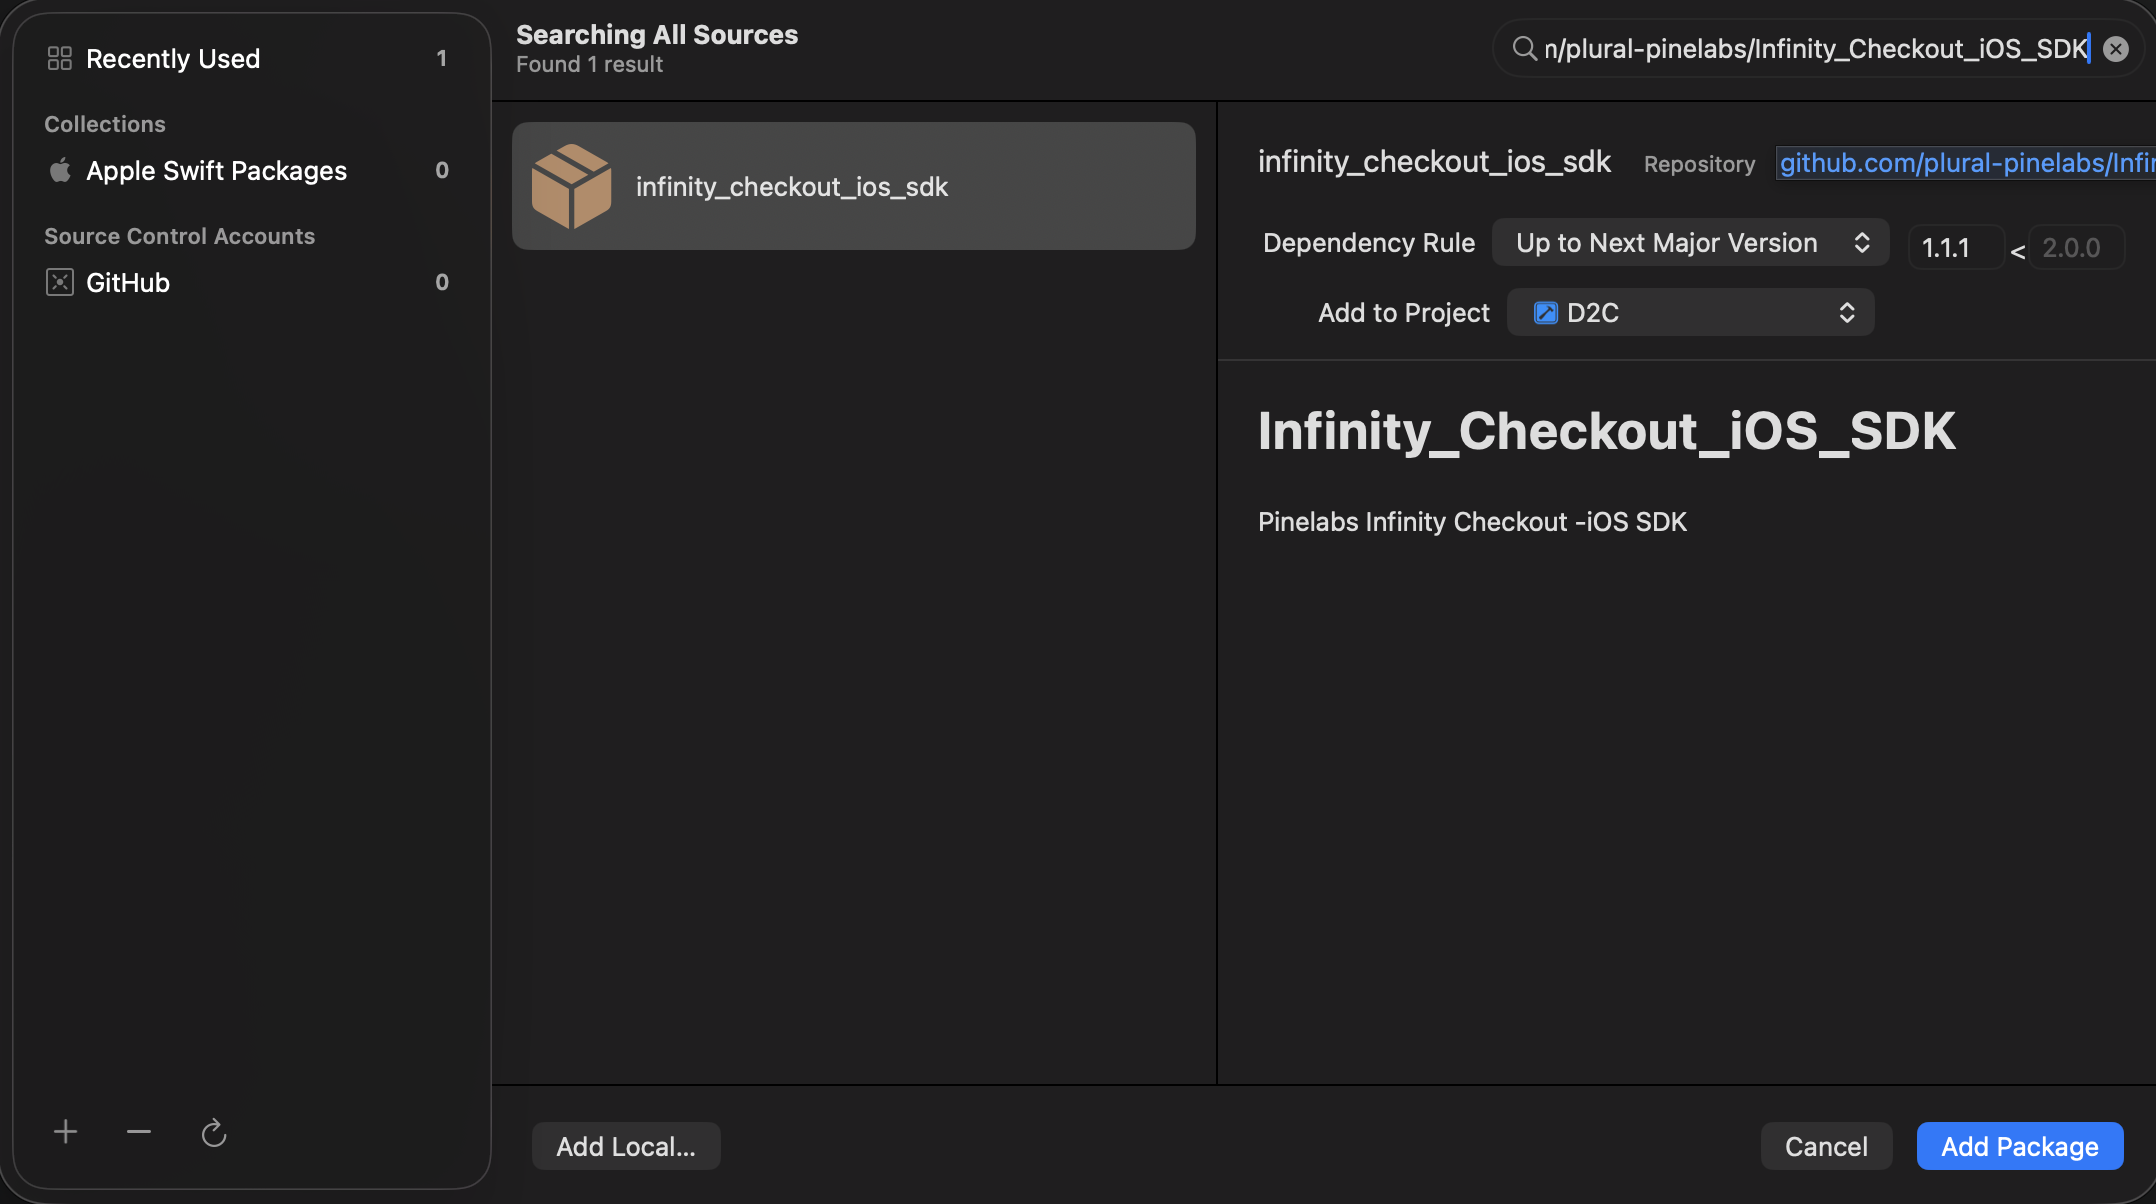
Select Release Tag
Choose the latest Release Tag (e.g., 1.1.1).
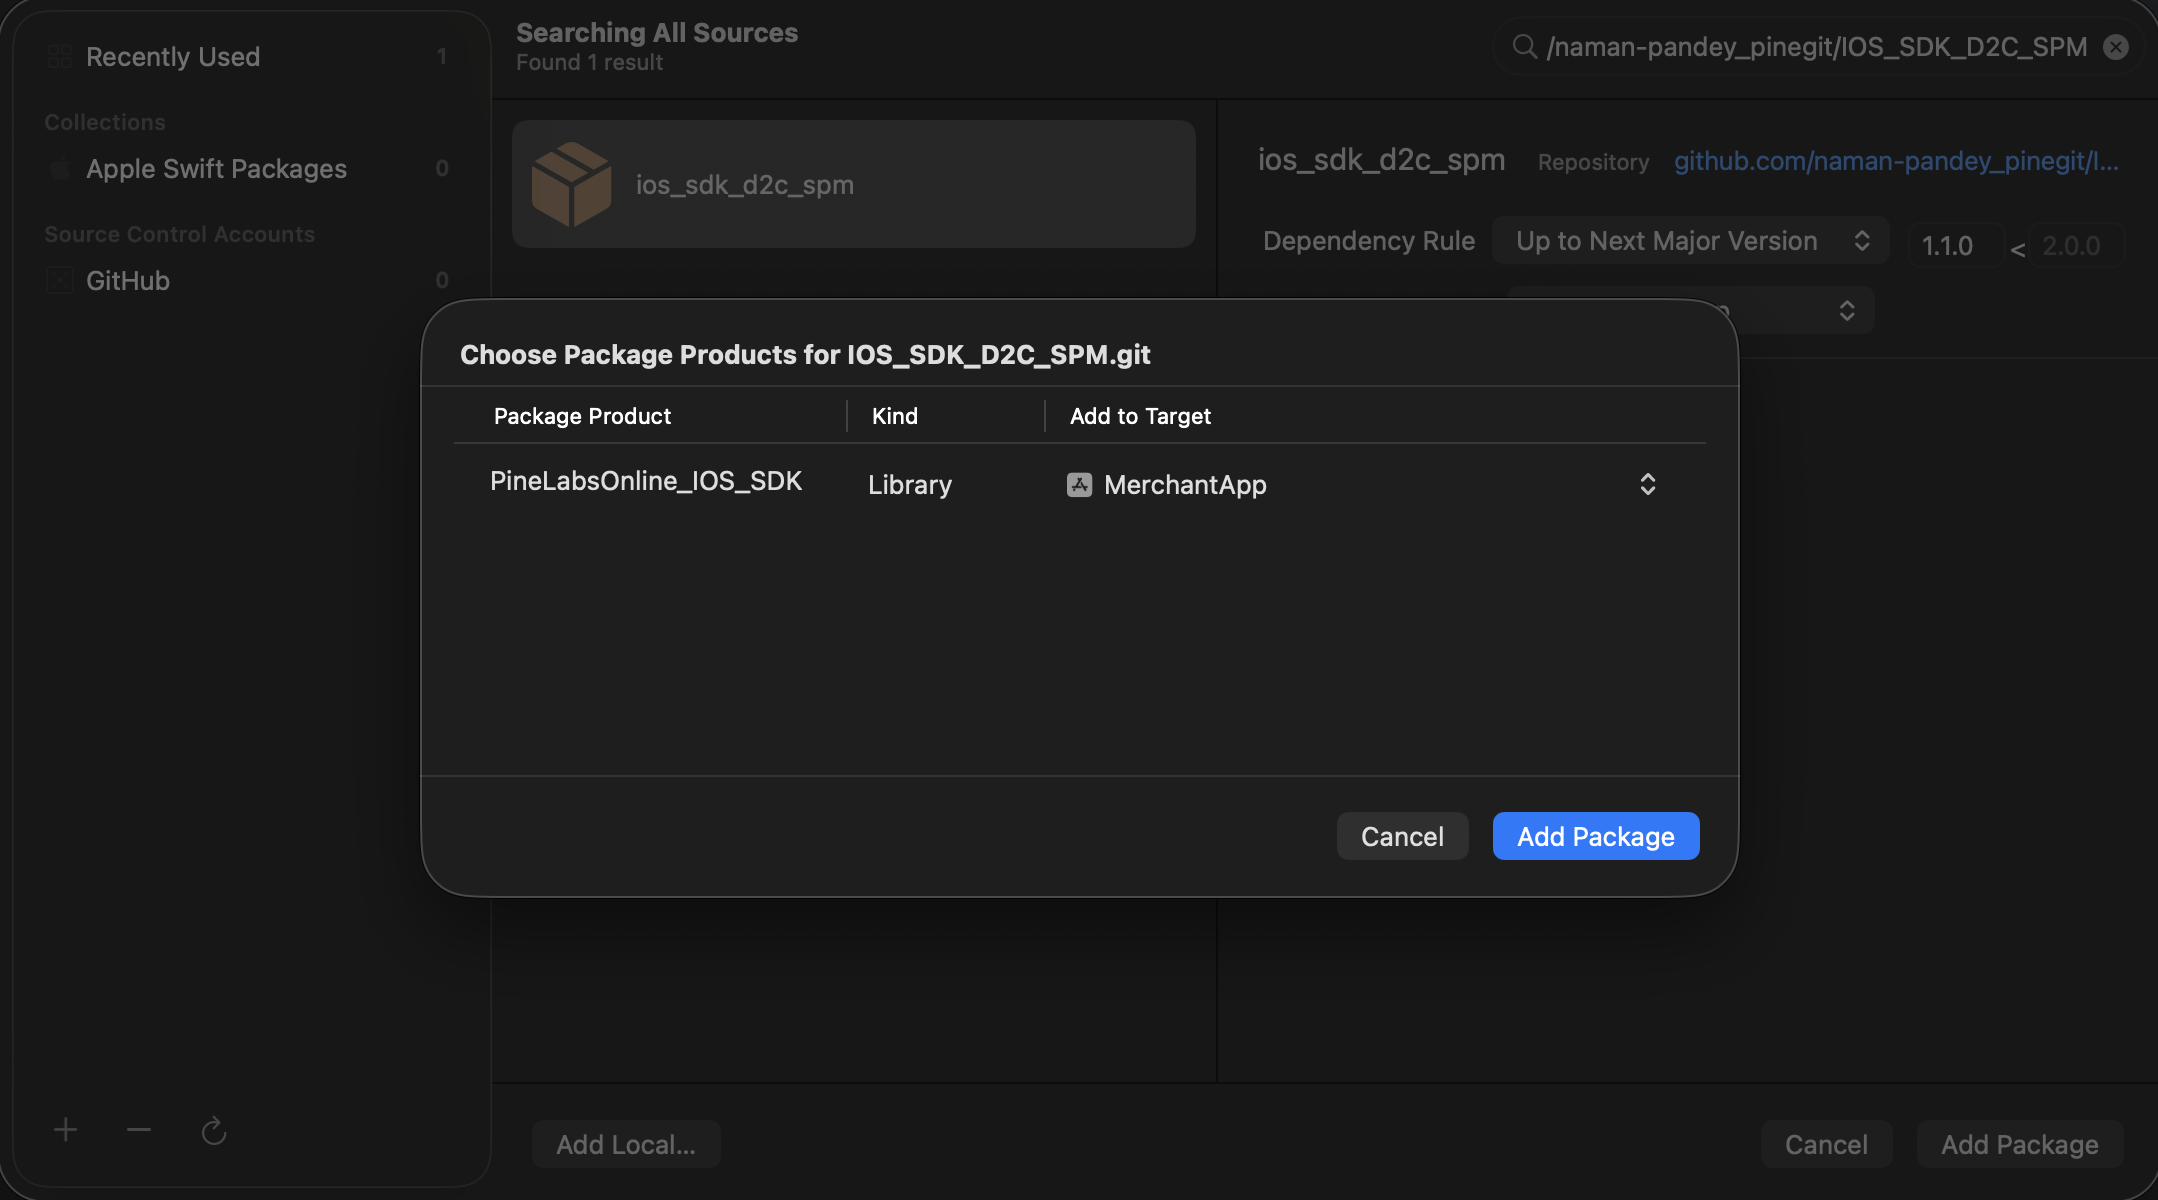
Add to App Target
Add the package to your App Target.
Verify Installation
Once added, it should appear in the General tab of your app target. You can also see the package details by clicking on the Package Dependency.
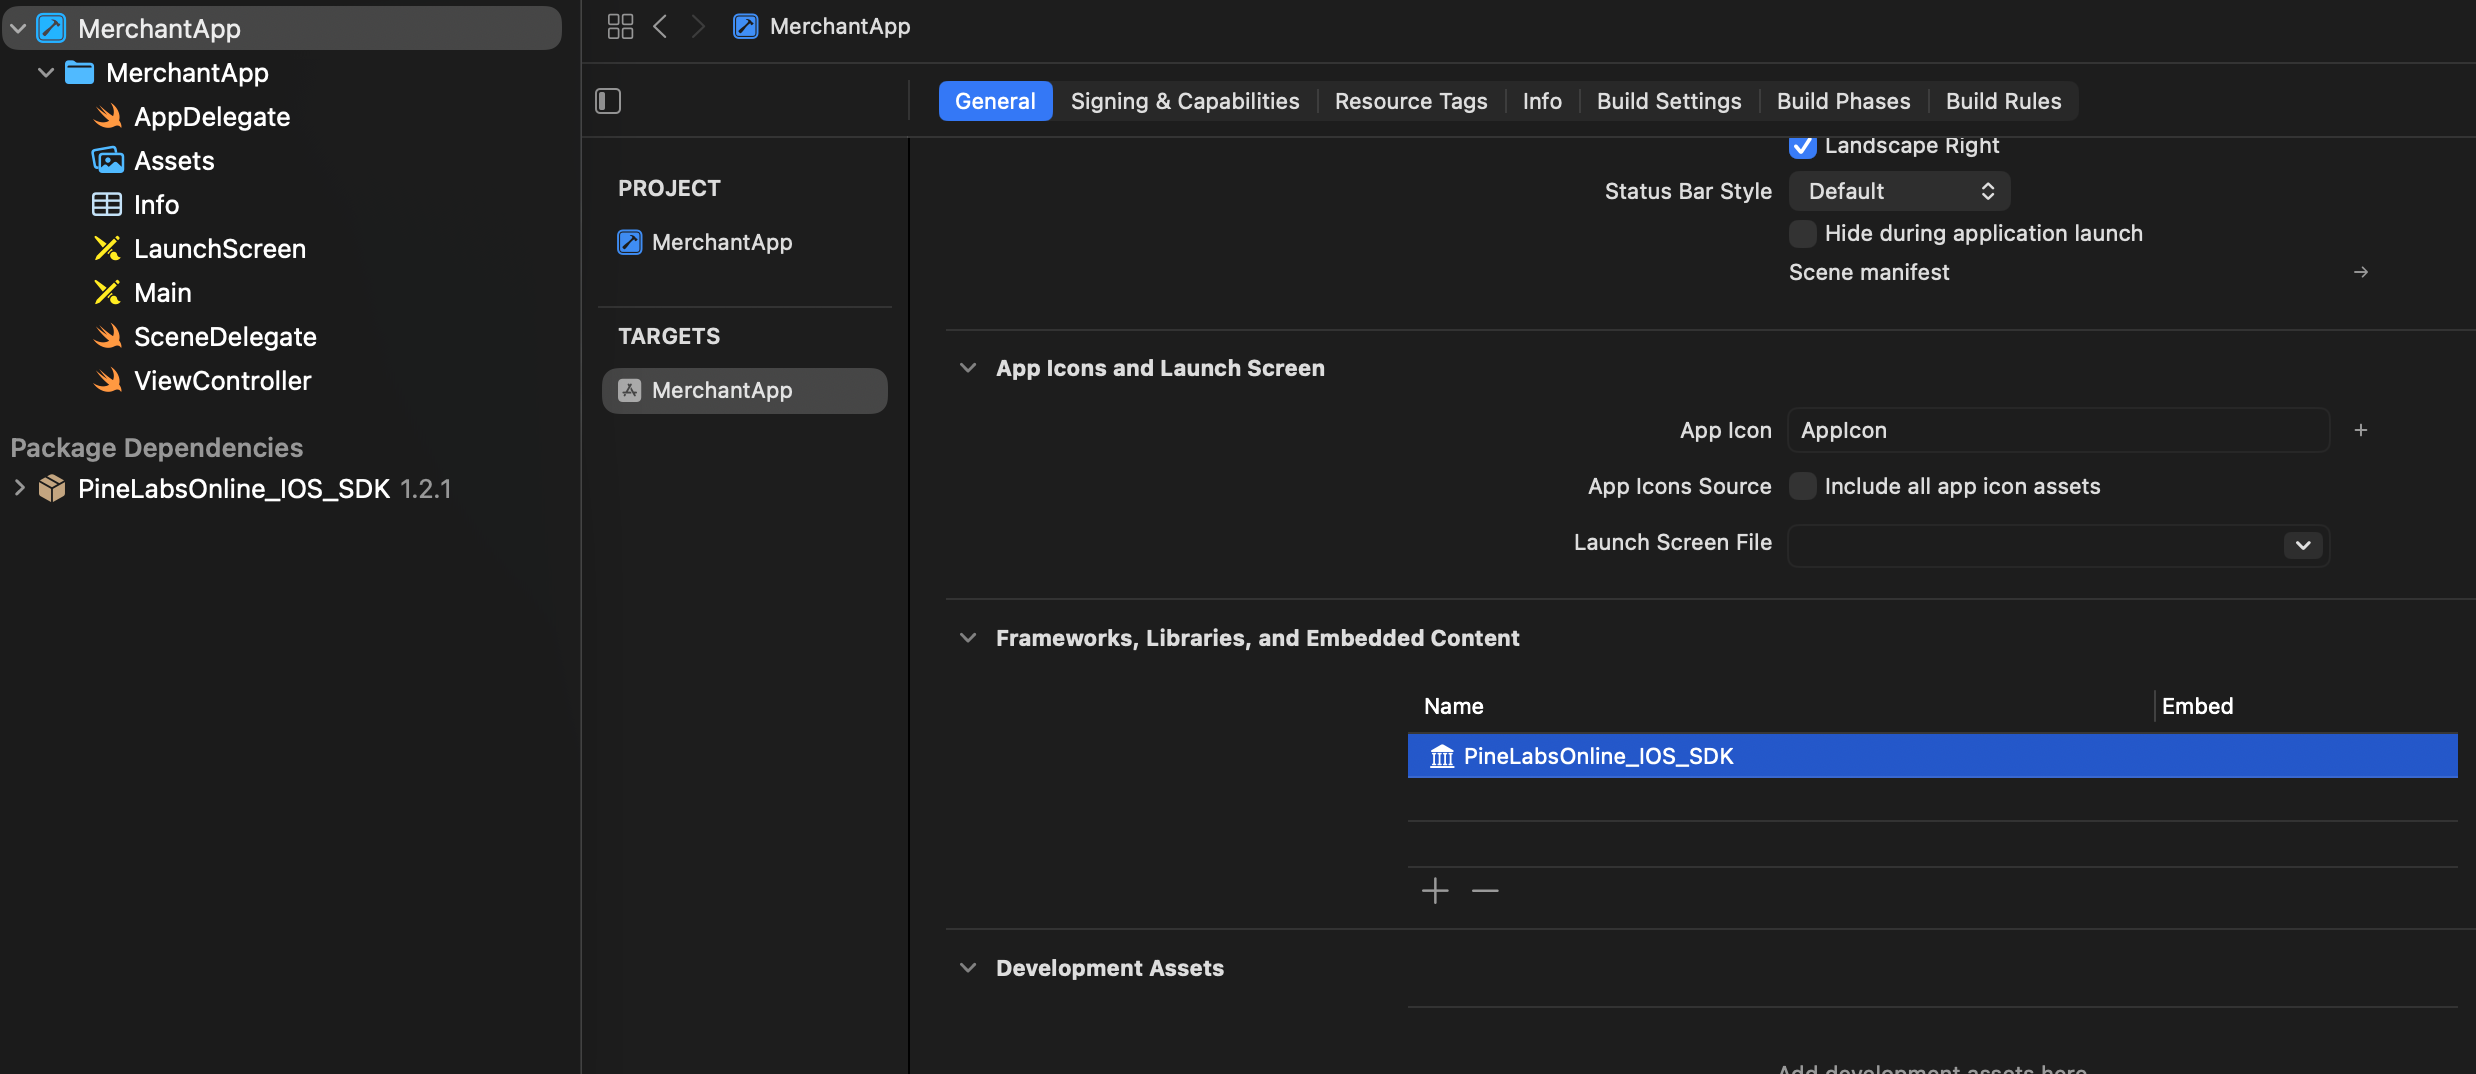
You can also see the package details by clicking on the Package Dependency.
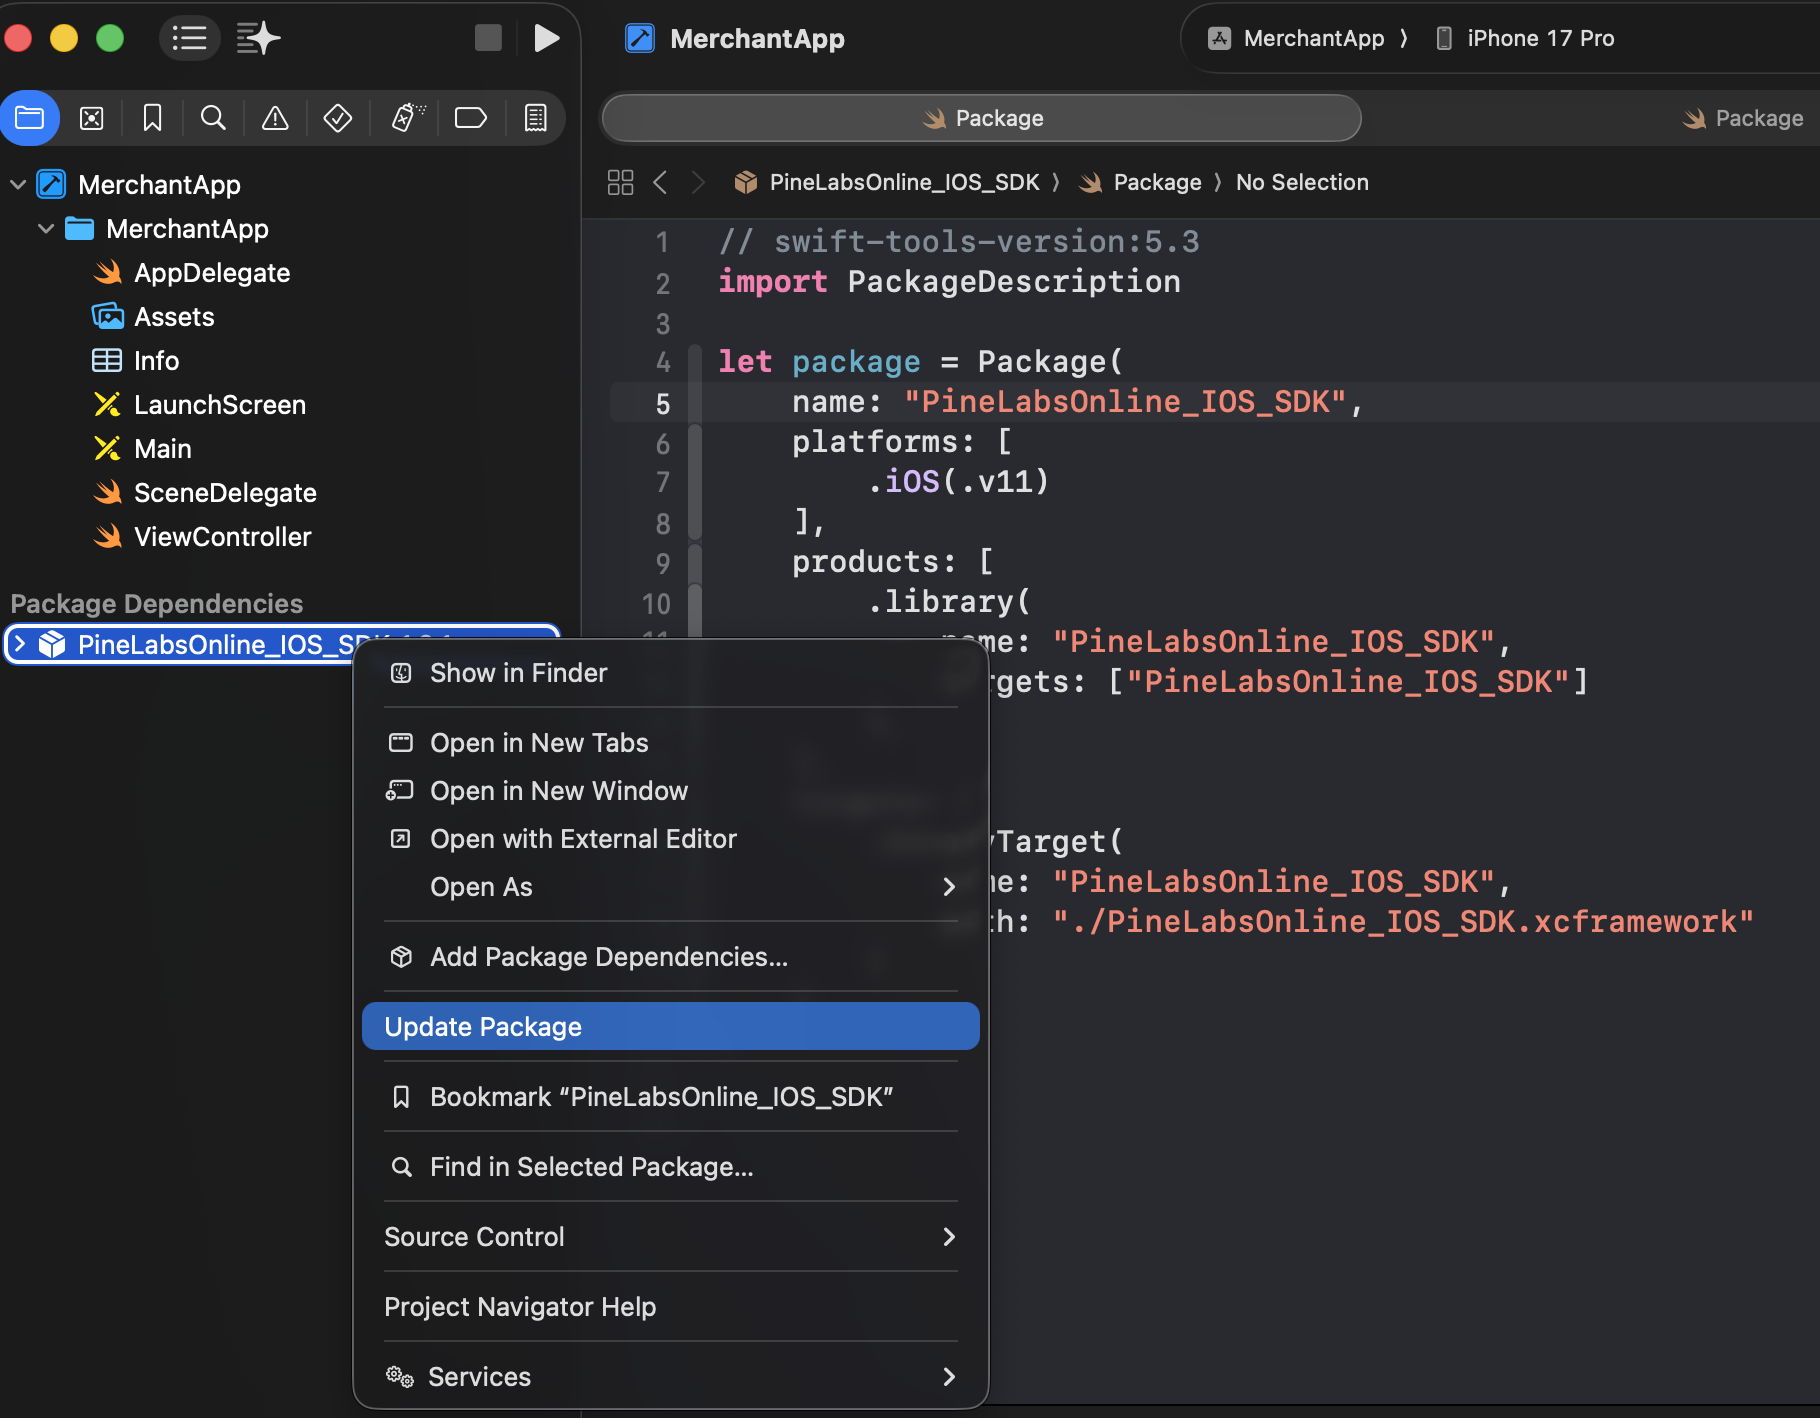
Easy Updates
In case of any new release update, simply select Update Package and it will automatically get the latest build.
2.2 Add the SDK via Manual Method
To add the SDK to your app, import the (SDKFramework).xcframework file to the project using the following steps:
Installation Steps
Download the SDK Framework
You can download the SDK as a (SDKFramework).xcframework file here, which is in a package format that Apple recommends for distributing binary frameworks.
Drag and Drop Framework
Drag and drop the (SDKFramework).xcframework file into your Xcode project in the Project Navigator under the Frameworks section.
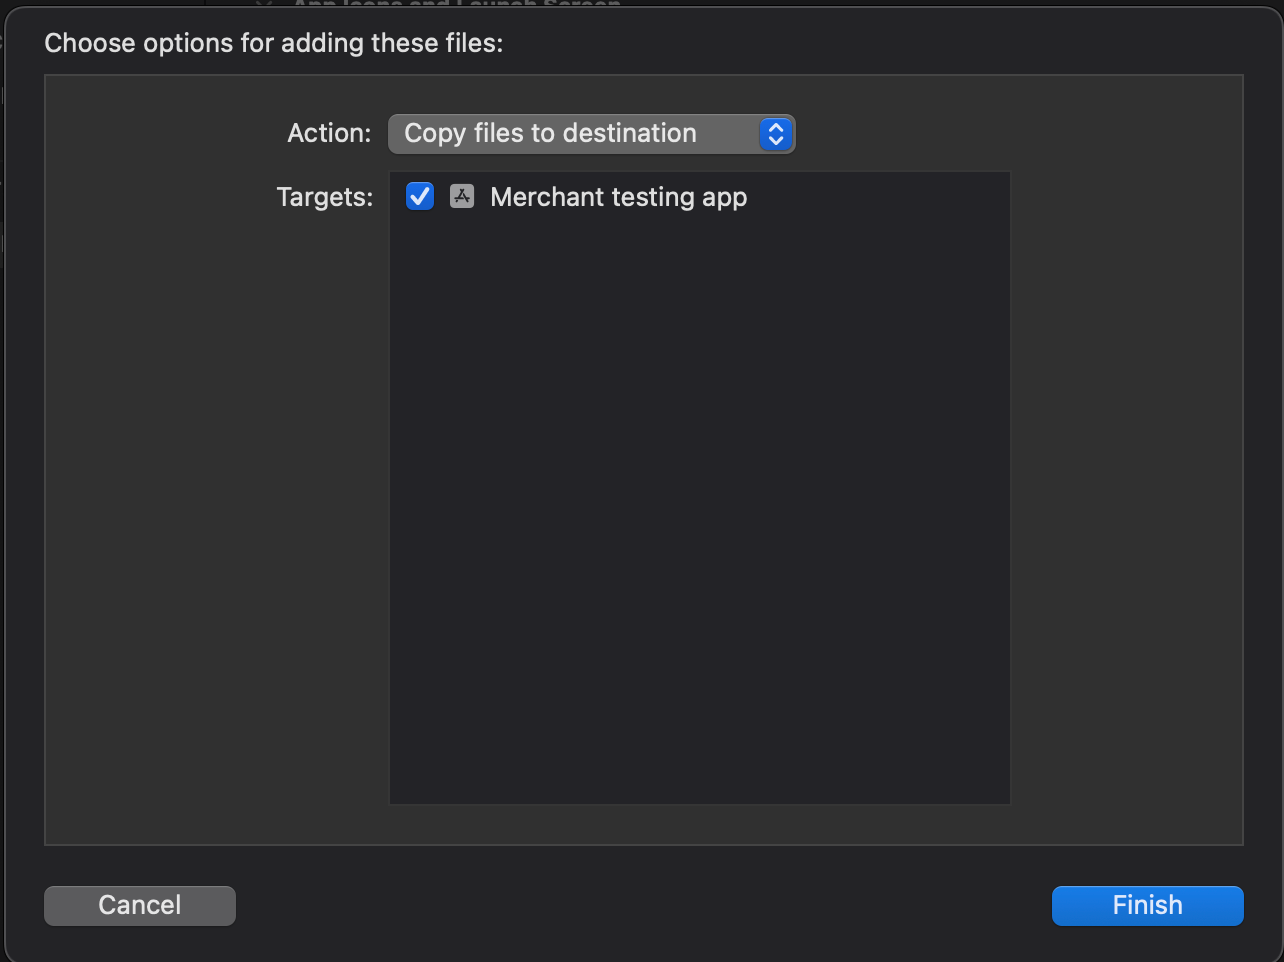
Configure Dialog Settings
A dialog box will appear when you drop the framework file into your project.
Ensure that the checkbox labeled "Copy items if needed" is selected. This ensures the framework gets copied into your project directory, making it available for builds.
Complete Installation
Drag and drop the .xcframework in the app.

Copy files to destination.
Note:
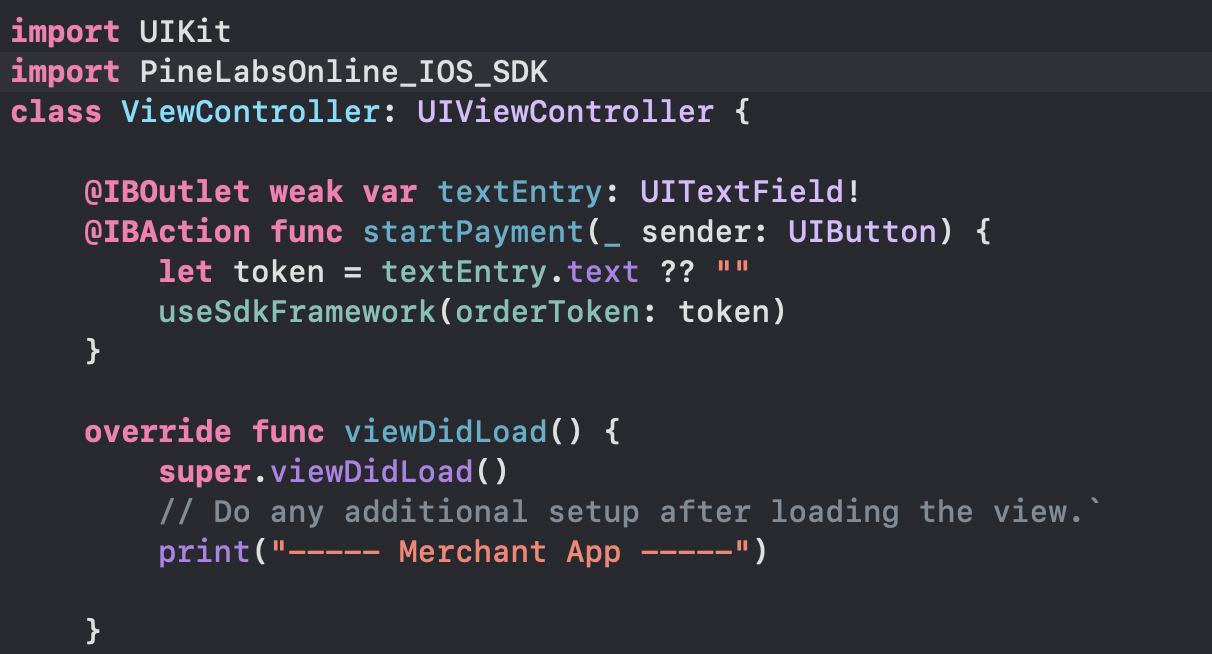
The
userSDKFrameworkfunction, created during the SDK installation, implements startPayment. Use this function to pass the order token and initiate the call toios_SDK.
Watch Out:
Ensure that the minimum compilation compatibility version is set to iOS 16 or 17
3. Configure the App Target
You need to configure the target to embed the SDK framework properly.
-
Navigate to the General tab of your target's settings. Add the
(SDKFramework).xcframeworkfile under the Frameworks, Libraries, and Embedded Content section. -
Ensure you choose
Embed & Sign. This ensures the framework is embedded in your app when it's built and signed properly to run on iOS devices.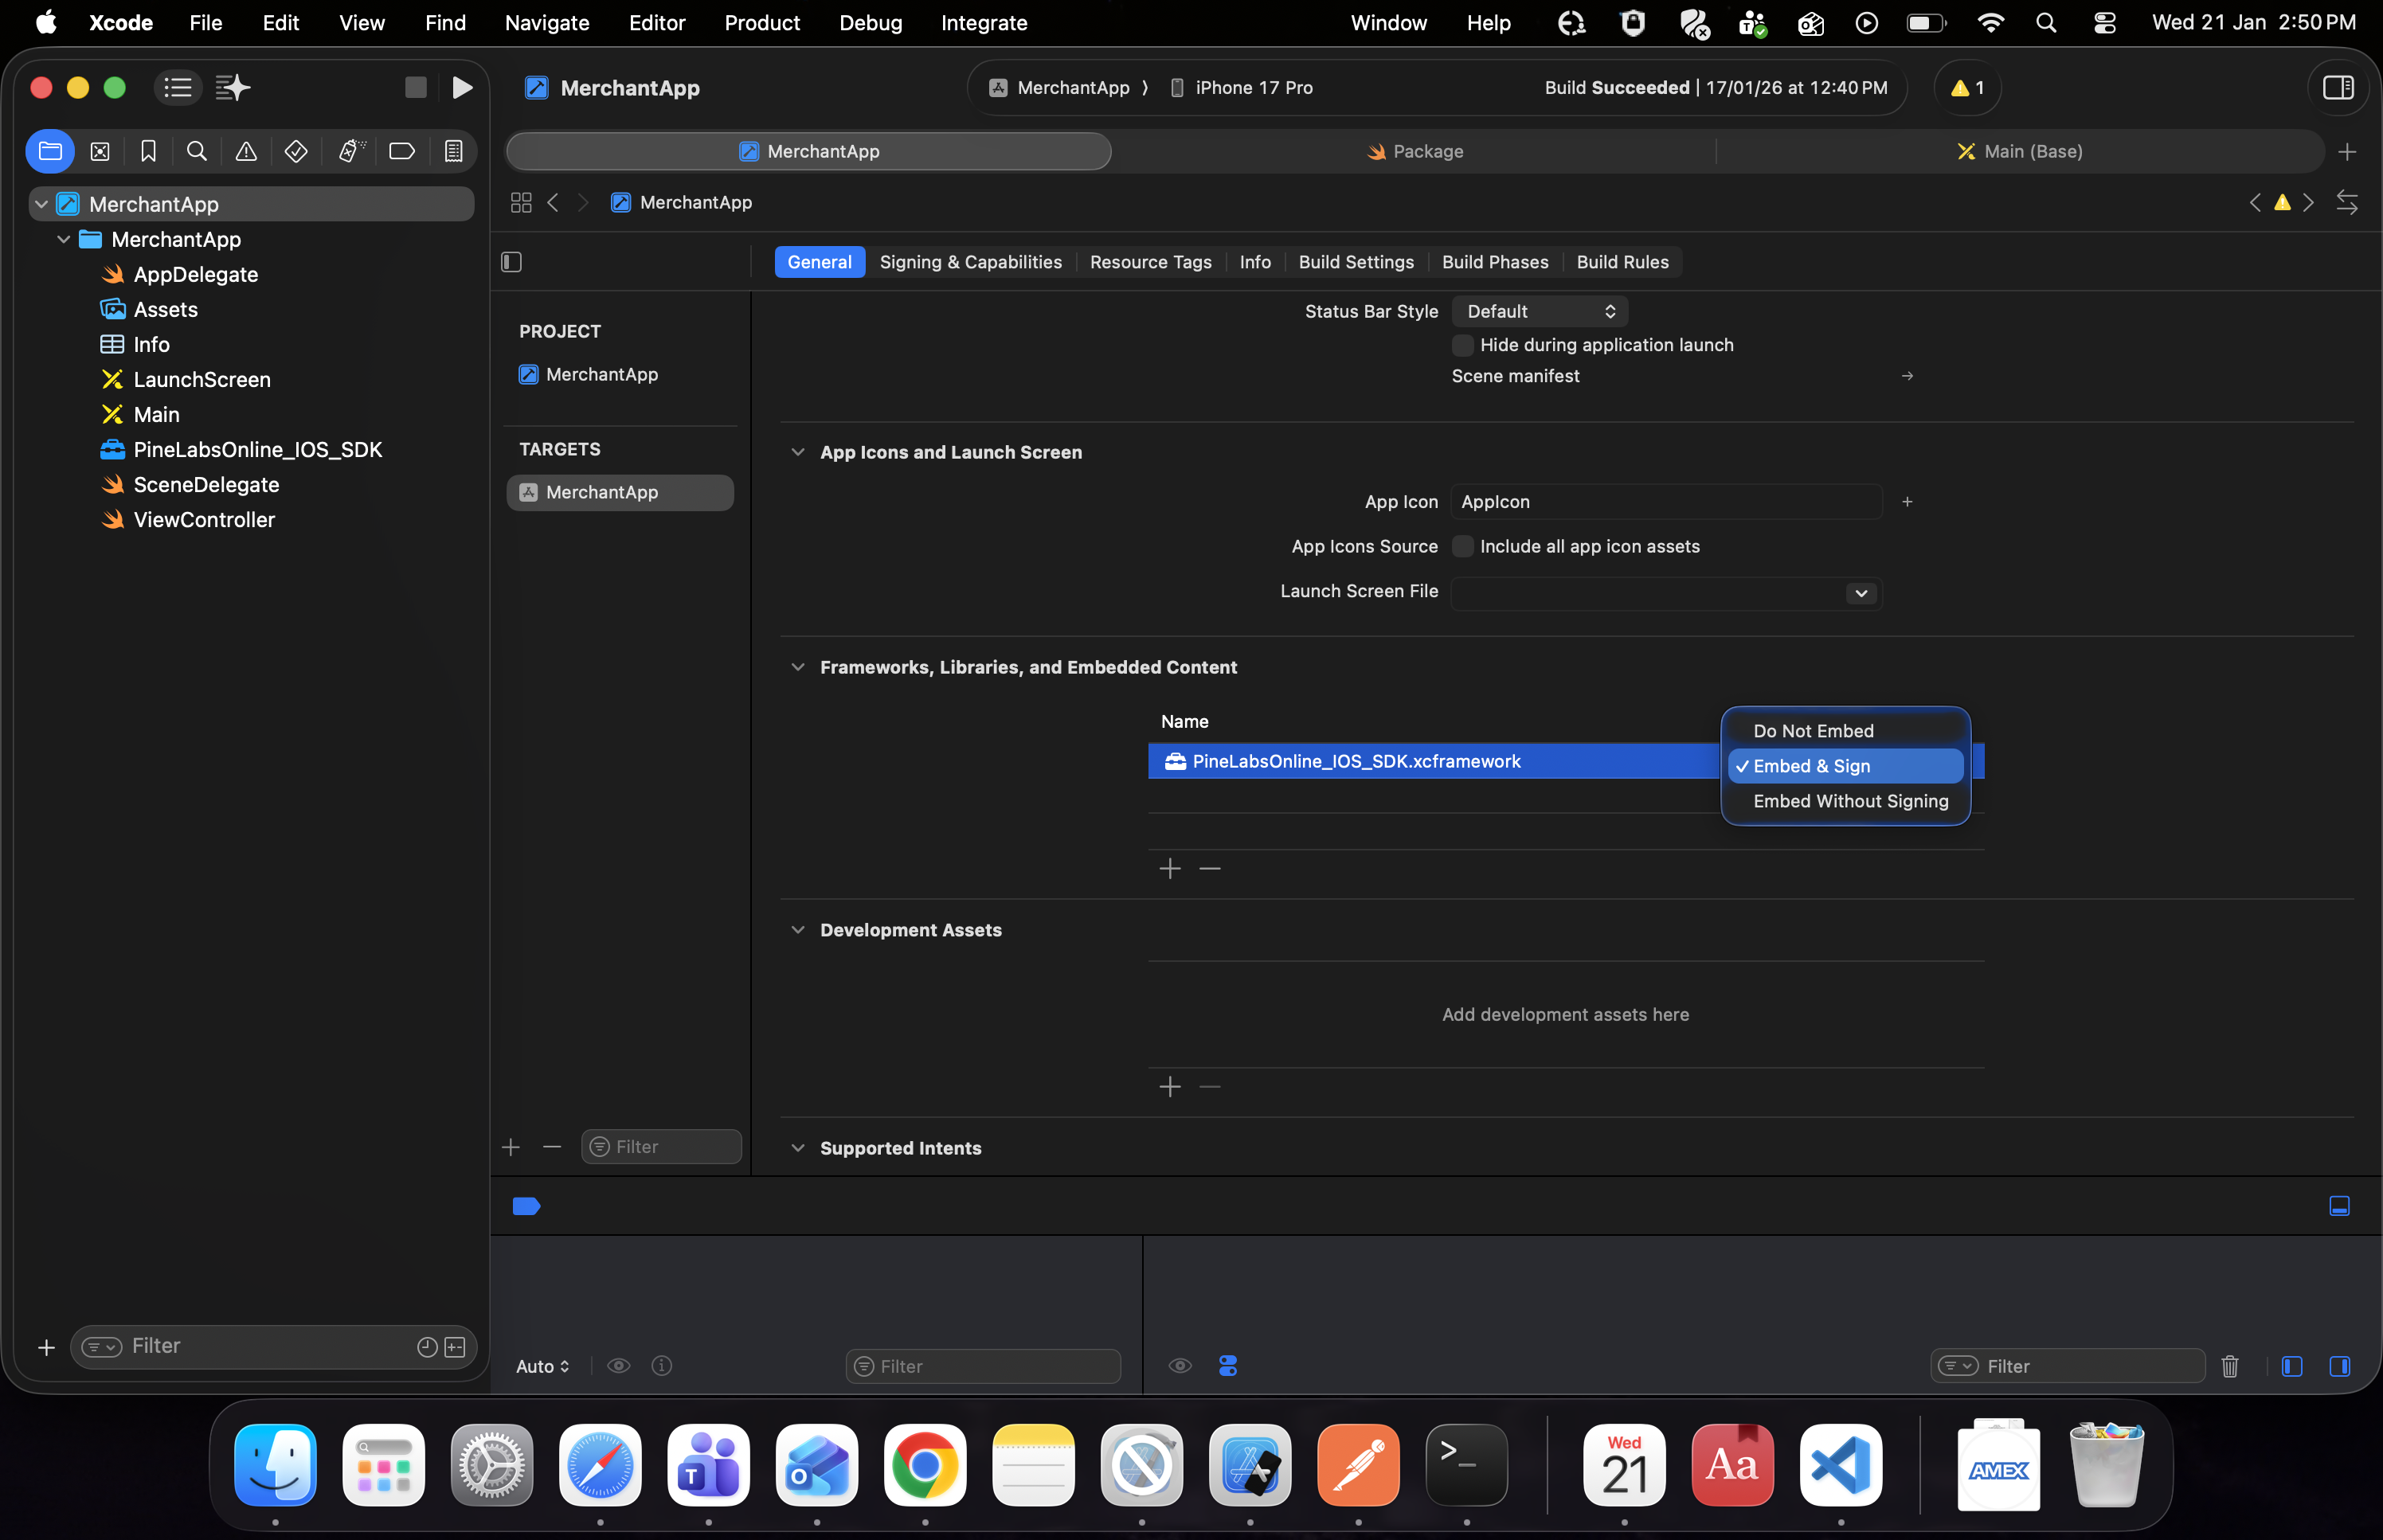
Note:
- Once the
.xcframeworkis embedded, you can import the package in the view controller.
- Info.plist update: To ensure proper functionality, you must update your app’s
Info.plist(Information Property List) file to allow the required connections.
To enable UPI payments, add the necessary URL Schemes in theInfo.plistfile as shown below:
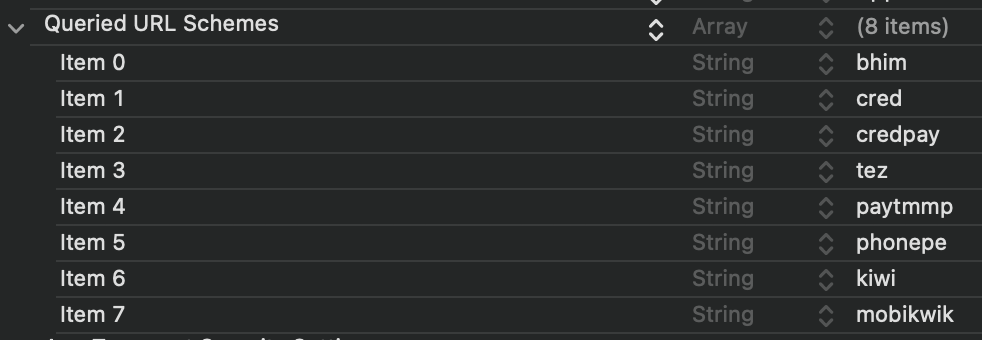
Figure: Property List View
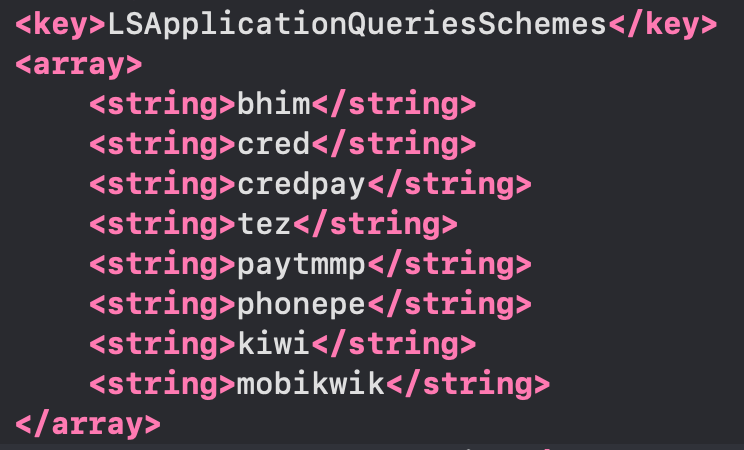
Figure: Source Code View
Without these entries, the SDK won’t be able to navigate to the required UPI payment app.
4. Initialize SDK
To initialise the iOS Native SDK, follow the below steps:
-
Import the SDK into the app and,
-
Create an object of the class
EdgeControllerto initiate the payment function. In your application, you are creating a function that passes the order token received from the create order response to start the payment function of our SDK.
Parameters for startPayment:
from: Pass the context of the current ViewController where the SDK is invoked(generally ‘self’).
orderToken: The token generated from the Create Hosted Checkout API response.
environment: Use .uat for testing (default) or .prod for production.
MerchantCallbackResponse: An instance that sends callback messages to the merchant IOS app. This value remains constant.
Note:
- You can use a single build and change the environment variable to run the
SDKin eitherUATorProduction. Currently, only two modes are supported:.uatfor UAT and.prodfor Production.
5. Handle Payments
You need to implement call-back methods to handle your payment responses. This will provide the payment status and reason for transaction failures. Based on the reasons for failures, handling can be built at your end. Transaction callbacks can be listened to via overriding methods of ResponseCallback.
In case of success, inside the SDK we check if the URL being loaded is the completion/final URL in the checkout flow. If that URL is being opened, then onSuccessResponse() is called from your app, which will return the flow back to your app from the SDK, indicating a successful transaction.
onFailureResponse: This method is called when SDK reaches a failure state.
onSuccessResponse: This method is called when the SDK reaches the success state.
onCancelTxn: This method is called when the user cancels the transaction.
onPressedBackButton: This method is called when the user presses the back button.
public class MerchantCallbackResponse: UIViewController, ResponseCallback {

    public func onFailureResponse(orderID: String, status: String, code: String, message: String) {
        print("Test app response: error occurred")
    }

    public func onSuccessResponse(orderId: String, status: String) {
        print("Test app response: transaction response")
    }

    public func onCancelTxn(orderId: String, code: Int, message: String) {
        print("Test app response: transaction cancelled")
    }

    public func onPressedBackButton(code: Int, message: String) {
        print("Test app response: back pressed")
    }
}
6. Manage Transactions
To get the status of the transaction made from your application, you can use our Fetch APIs to know the real time status.
6.1. Get Order by Order ID
Use this API to know the real time status of the transaction made on your application. Refer to our Get Order by Order ID API documentation to learn more.
6.2. Webhooks
You can configure the webhook events to know the status of your transactions. Refer to our Webhooks documentation to learn more.
Updated about 2 hours ago